Скачать программу блу скрин. Общие рекомендации по устранению ошибок BSOD для начинающих
Related Utilities
- WinCrashReport - Displays a report about crashed Windows application.
- WhatIsHang - Get information about Windows software that stopped responding (hang)
- AppCrashView - View application crash information on Windows 7/Vista.
See Also
- NK2Edit - Edit, merge and fix the AutoComplete files (.NK2) of Microsoft Outlook.
Description
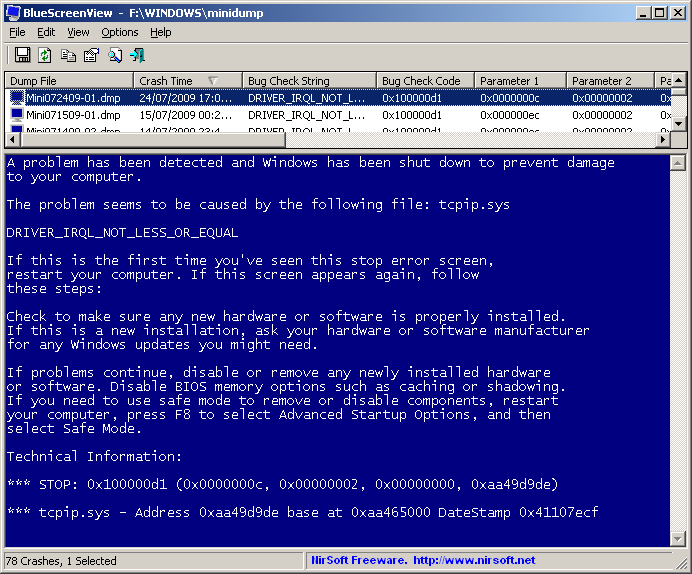
BlueScreenView scans all your minidump files created during "blue screen of death" crashes, and displays the information about all crashes in one table. For each crash, BlueScreenView displays the minidump filename, the date/time of the crash, the basic crash information displayed in the blue screen (Bug Check Code and 4 parameters), and the details of the driver or module that possibly caused the crash (filename, product name, file description, and file version).For each crash displayed in the upper pane, you can view the details of the device drivers loaded during the crash in the lower pane. BlueScreenView also mark the drivers that their addresses found in the crash stack, so you can easily locate the suspected drivers that possibly caused the crash.

Versions History
- Version 1.55:
- Added Drag & Drop support: You can now drag a single MiniDump file from Explorer into the main window of BlueScreenView.
- Fixed bug: BlueScreenView failed to remember the last size/position of the main window if it was not located in the primary monitor.
- Version 1.52:
- Added "Google Search - Bug Check" and "Google Search - Bug Check + Parameter 1" options.
- Version 1.51:
- Added automatic secondary sorting ("Crash Time" column).
- Added 64-bit build.
- Version 1.50:
- The "Crash Time" now displays more accurate date/time of the crash. In previous versions, the value of "Crash Time" column was taken from the date/time of dump file, which actually represents that time that Windows loaded again, after the crash. The actual crash time is stored inside the dump file , and now the "Crash Time" displays this value.
- Added "Dump File Time" column, which displays the modified time of the dump file.
- Version 1.47:
- Added "Auto Size Columns+Headers" option, which allows you to automatically resize the columns according to the row values and column headers.
- Version 1.46:
- Fixed issue: The properties and the "Advanced Options" windows opened in the wrong monitor, on multi-monitors system.
- Version 1.45:
- You can now choose to open only a specific dump file - from the user interface or from command-line.
- You can now also specify the MiniDump folder or MiniDump file as a single parameter, and BlueScreenView will be opened with the right dump file/folder, for example: BlueScreenView.exe C:\windows\minidump\Mini011209-01.dmp
- Version 1.40:
- Added "Raw Data" mode on the lower pane, which displays the processor registers and memory hex dump.
- Version 1.35:
- Added "Crash Address" column.
- Added 3 columns that display that last 3 calls found in the stack (Only for 32-bit crashes)
- Version 1.32:
- Added "Mark Odd/Even Rows" option, under the View menu. When it"s turned on, the odd and even rows are displayed in different color, to make it easier to read a single line.
- Version 1.31:
- Added "Google Search - Bug Check+Driver" for searching in Google the driver name and bug check code of the selected blue screen.
- Version 1.30:
- Added "Dump File Size" column.
- Version 1.29:
- You can now send the list of blue screen crashes to stdout by specifying an empty filename ("") in the command-line of all save parameters.
For example: bluescreenview.exe /stab "" > c:\temp\blue_screens.txt
- You can now send the list of blue screen crashes to stdout by specifying an empty filename ("") in the command-line of all save parameters.
- Version 1.28:
- Added "Add Header Line To CSV/Tab-Delimited File" option. When this option is turned on, the column names are added as the first line when you export to csv or tab-delimited file.
- Version 1.27:
- Fixed issue: removed the wrong encoding from the xml string, which caused problems to some xml viewers.
- Version 1.26:
- Fixed "DumpChk" mode to work properly when DumpChk processing takes more than a few seconds.
- Version 1.25:
- Added "DumpChk" mode, which displays the output of Microsoft DumpChk utility (DumpChk.exe). You can set the right path and parameters of DumpChk in "Advanced Options" window. By default, BlueScreenView tries to run DumpChk from "%programfiles%\Debugging Tools for Windows"
- The default MiniDump folder is now taken from HKEY_LOCAL_MACHINE\SYSTEM\CurrentControlSet\Control\CrashControl
- Version 1.20:
- Added 3 new columns in the upper pane: Processors Count, Major Version, Minor Version.
- Added "Explorer Copy" option, which allows you to copy dump files to the clipboard and then paste them into Explorer window.
- Version 1.15:
- Added option to view the blue screen list of multiple computers on your network. The computer names are specified in a simple text file. (See below).
- Added Combo-Box to easily choose the MiniDump folders available in the hard-disks currently attached to your computer.
- Added "Computer Name" and "Full Path" columns.
- Version 1.11:
- Added /sort command-line option.
- Version 1.10:
- Added accelerator keys for allowing you to toggle between modes more easily.
- Added command-line options for saving the crash dumps list to text/csv/html/xml file.
- Added command-line option for opening BlueScreenView with the desired MiniDump folder.
- Fixed focus problems when opening the "Advanced Options" window.
- Added "default" button to the "Advanced Options" window.
- Added "processor" column - 32-bit or x64.
- Version 1.05 - Added support for x64 MiniDump files.
- Version 1.00 - First release.
BlueScreenView Features
- Automatically scans your current minidump folder and displays the list of all crash dumps, including crash dump date/time and crash details.
- Allows you to view a blue screen which is very similar to the one that Windows displayed during the crash.
- BlueScreenView enumerates the memory addresses inside the stack of the crash, and find all drivers/modules that might be involved in the crash.
- BlueScreenView also allows you to work with another instance of Windows, simply by choosing the right minidump folder (In Advanced Options).
- BlueScreenView automatically locate the drivers appeared in the crash dump, and extract their version resource information, including product name, file version, company, and file description.
System Requirements
- BlueScreenView works with Windows XP, Windows Server 2003, Windows Server 2008, Windows Vista, Windows 7, Windows 8, Windows 10, as long as Windows is configured to save minidump files during BSOD crashes. If your system doesn"t create MiniDump files on a blue screen crash, try to configure it according to the following article:
- BlueScreenView can read the MiniDump files of both 32-bit and x64 systems.
- Be aware that on Windows 10, some of the created MiniDump files might be empty and BlueScreenView will not display them.
Using BlueScreenView
BlueScreenView doesn"t require any installation process or additional dll files. In order to start using it, simply run the executable file - BlueScreenView.exeAfter running BlueScreenView, it automatically scans your MiniDump folder and display all crash details in the upper pane.
Crashes Information Columns (Upper Pane)
- Dump File: The MiniDump filename that stores the crash data.
- Crash Time: The created time of the MiniDump filename, which also matches to the date/time that the crash occurred.
- Bug Check String: The crash error string. This error string is determined according to the Bug Check Code, and it"s also displayed in the blue screen window of Windows.
- Bug Check Code: The bug check code, as displayed in the blue screen window.
- Parameter 1/2/3/4: The 4 crash parameters that are also displayed in the blue screen of death.
- Caused By Driver: The driver that probably caused this crash. BlueScreenView tries to locate the right driver or module that caused the blue screen by looking inside the crash stack. However, be aware that the driver detection mechanism is not 100% accurate, and you should also look in the lower pane, that display all drivers/modules found in the stack. These drivers/modules are marked in pink color.
- Caused By Address: Similar to "Caused By Driver" column, but also display the relative address of the crash.
- File Description: The file description of the driver that probably caused this crash. This information is loaded from the version resource of the driver.
- Product Name: The product name of the driver that probably caused this crash. This information is loaded from the version resource of the driver.
- Company: The company name of the driver that probably caused this crash. This information is loaded from the version resource of the driver.
- File Version: The file version of the driver that probably caused this crash. This information is loaded from the version resource of the driver.
- Crash Address: The memory address that the crash occurred. (The address in the EIP/RIP processor register) In some crashes, this value might be identical to "Caused By Address" value, while in others, the crash address is different from the driver that caused the crash.
- Stack Address 1 - 3: The last 3 addresses found in the call stack. Be aware that in some crashes, these values will be empty. Also, the stack addresses list is currently not supported for 64-bit crashes.
Drivers Information Columns (Lower Pane)
- Filename: The driver/module filename
- Address In Stack: The memory address of this driver that was found in the stack.
- From Address: First memory address of this driver.
- To Address: Last memory address of this driver.
- Size: Driver size in memory.
- Time Stamp: Time stamp of this driver.
- Time String: Time stamp of this driver, displayed in date/time format.
- Product Name: Product name of this driver, loaded from the version resource of the driver.
- File Description: File description of this driver, loaded from the version resource of the driver.
- File Version: File version of this driver, loaded from the version resource of the driver.
- Company: Company name of this driver, loaded from the version resource of the driver.
- Full Path: Full path of the driver filename.
Lower Pane Modes
Currently, the lower pane has 4 different display modes. You can change the display mode of the lower pane from Options->Lower Pane Mode menu.- All Drivers: Displays all the drivers that were loaded during the crash that you selected in the upper pane. The drivers/module that their memory addresses found in the stack, are marked in pink color.
- Only Drivers Found In Stack: Displays only the modules/drivers that their memory addresses found in the stack of the crash. There is very high chance that one of the drivers in this list is the one that caused the crash.
- Blue Screen in XP Style: Displays a blue screen that looks very similar to the one that Windows displayed during the crash.
- DumpChk Output:
Displays the output of Microsoft DumpChk utility.
This mode only works when Microsoft DumpChk is installed on your computer and
BlueScreenView is configured to run it from the right folder (In the Advanced Options window).
You can get DumpChk from the installation CD/DVD of Windows or with the installtion of Debugging Tools for Windows .
Crashes of Remote Network Computer
If you have multiple computers on your network and you have full administrator access to them (e.g: you have access to \\ComputerName\c$), you can also view the crashes of the other computers on your network remotely. In order to do that, simply go to "Advanced Options" (Ctrl+O) and type the MiniDump folder of the remote computer, for example: \\MyComp\c$\Windows\MiniDump.Notice: If you fail to get full administrator access to the remote computer, you should read the instructions in the following Blog post: .
Watching the crashes of multiple computers on your network
If you have a network with multiple computers, and you have full admin access to these computers, you can view the blue screens list of all these computers in one table, and easily detect computers with recurring BSOD problems.In order to use this feature, prepare a list of all computer names/IP addresses that you want to inspect, and save it to a simple text file.
The computer names in the list can be delimited by comma, semicolon, tab character, or Enter (CRLF).
Example for computer names list:
Comp01 comp02 192.168.0.1 192.168.0.2 192.168.0.4 After you have a text file contains the computers list, you can go to Advanced Options window (Ctrl+O), choose the second option and type the computers list filename.
Command-Line Options
|
/LoadFrom |
Specifies the source to load from.
1 -> Load from a single MiniDump folder (/MiniDumpFolder parameter) 2 -> Load from all computers specified in the computer list file. (/ComputersFile parameter) 3 -> Load from a single MiniDump file (/SingleDumpFile parameter) |
|
/MiniDumpFolder | Start BlueScreenView with the specified MiniDump folder. |
|
/SingleDumpFile | Start BlueScreenView with the specified MiniDump file. (For using with /LoadFrom 3) |
|
/ComputersFile | Specifies the computers list filename. (When LoadFrom = 2) |
| /LowerPaneMode <1 - 3> | Start BlueScreenView with the specified mode. 1 = All Drivers, 2 = Only Drivers Found In Stack, 3 = Blue Screen in XP Style. |
|
/stext | Save the list of blue screen crashes into a regular text file. |
|
/stab | Save the list of blue screen crashes into a tab-delimited text file. |
|
/scomma | Save the list of blue screen crashes into a comma-delimited text file (csv). |
|
/stabular | Save the list of blue screen crashes into a tabular text file. |
|
/shtml | Save the list of blue screen crashes into HTML file (Horizontal). |
|
/sverhtml | Save the list of blue screen crashes into HTML file (Vertical). |
|
/sxml | Save the list of blue screen crashes into XML file. |
|
/sort |
This command-line option can be used with other save options for sorting by the desired column.
If you don"t specify this option, the list is sorted according to the last sort that you made from the user interface.
The Examples:
|
| /nosort | When you specify this command-line option, the list will be saved without any sorting. |
Translating BlueScreenView to other languages
In order to translate BlueScreenView to other language, follow the instructions below:- Run BlueScreenView with /savelangfile parameter:
BlueScreenView.exe /savelangfile
A file named BlueScreenView_lng.ini will be created in the folder of BlueScreenView utility. - Open the created language file in Notepad or in any other text editor.
- Translate all string entries to the desired language. Optionally, you can also add your name and/or a link to your Web site. (TranslatorName and TranslatorURL values) If you add this information, it"ll be used in the "About" window.
- After you finish the translation, Run BlueScreenView, and all translated
strings will be loaded from the language file.
If you want to run BlueScreenView without the translation, simply rename the language file, or move it to another folder.
License
This utility is released as freeware. You are allowed to freely distribute this utility via floppy disk, CD-ROM, Internet, or in any other way, as long as you don"t charge anything for this. If you distribute this utility, you must include all files in the distribution package, without any modification !У пользователей ПК есть сильный страх, который всех объединяет – BSOD (Blue Screen of Death, «синий экран смерти») – критическая ошибка, которая приводит к аварийному завершению работы системы без сохранения данных. Рядовому пользователю сложно расшифровать информацию о сбое, если после отображения технической информации компьютер сразу перезагружается. Поэтому рассмотрим, как пользоваться BlueScreenView – приложением, которое сохраняет и расшифровывает сведения о сбое в работе ОС.
Создание файла дампа
В операционных системах Windows 7, 8, 10 дамп оперативной памяти сохраняется автоматически. Но мы отредактируем настройки создания файла и оптимизируем их под BlueScreenView.
Пройдем по следующим пунктам:
- Откройте «Этот компьютер» – «Свойства системы».

- Нажмите «Дополнительные параметры системы».

- Во вкладке «Дополнительно» кликните на кнопку «Параметры» в блоке «Загрузка и восстановление».

- В появившемся окне уберите галочку с пункта «Заменять существующий файл дампа» и в поле «Запись отладочной информации» выберите «Малый дамп памяти (256 KB)».

Справка! Малый дамп памяти содержит необходимую информацию для анализа ошибки и не занимает много дискового пространства. А заменять существующий файл дампа не рекомендуется, т.к. ошибок несколько, а записывается — одна.
Анализ дампа памяти
Первым делом запустите BlueScreenView. Приложение автоматически сканирует папку хранения всех дампов памяти.
Для извлечения необходимой информации нужно:
- Выбрать нужный.dmp файл из списка, посмотреть на перечень драйверов и компонентов, загружавшихся во время последнего запуска ОС.

- Дважды кликнуть на поле, подсвеченное красным цветом.
- Ознакомиться с технической информацией об ошибке.

- Кликнув ПКМ на поле дампа памяти, вы можете импортировать данные в файл для последующей отправки специалисту или в службу поддержки. Также предусмотрена возможность поиска решения проблемы напрямую с приложения.

В итоге можно сказать, что пользоваться BlueScreenView – сплошное удовольствие. Это маленькая и функциональная утилита, которая освободит вас от необходимости караулить BSOD-ошибки с листом бумаги в руках.
Для желающих предоставляется видео о том, как пользоваться BlueScreenView.
Из-за пиратских копий Windows, многие пользователи сталкиваются с критическим сбоем Bluescreen на своем ПК. Чаще всего баг вызывает появление Синего экрана, который выскакивает после запуска игр или программ. После перезагрузки юзер получает окно уведомления с сигнатурой проблемы: «Имя события проблемы: BlueScreen . Код языка: 1049 «. Также указаны дополнительные сведения: версия ОС (например - 6.1 7601.2 1.0 256.1) и BCCode (может быть разным 116, 124, 50, 19, d1, f4, a и другие).
Пример критической стоп-ошибки BlueScreen 1049Что это за сбой BlueScreen 1049?
Причин появления стоп ошибок Bluescreen большое множество. Сам код (1049) указывает, что драйвер не смог своевременно ответить на запрос системы. Среди основных причин возникновения сбоя, можно выделить следующие:
- Соответствующий драйвер имеет проблемы;
- Проблемы с перегревом аппаратных частей компьютера (материнской платы или видеокарты);
- Неудачные попытки разогнать видеокарту;
- Проблемы с ОЗУ компьютера и другие неисправности.
Что делать с проблемой 1049?
- В большинстве случаев, основная причина появления сбоев - это «битые» драйвера видеокарты. Вы можете проверить все видео-контроллеры в Диспетчере задач и отыскать битый драйвер (с желтым значком). Жмите по нему правой кнопкой и удаляйте. После удаления запустите мастер очистки реестра (я использую сторонние утилиты - CCleaner). После очистки нажмите по проблемному контроллеру и выберите «Обновить драйвера».
 Пример удаления проблемных драйверов из Windows
 - Windows Installer работает очень плохо, поэтому лучше загрузить драйвера с официального ресурса разработчика или использовать диск со всеми конфигурациями, который идет в комплекте. Я же использую комплексную проверку и обновление всех драйверов при помощи утилиты DriverPack Solution
. Правда в ней появилось много дополнительных и рекламных установок в последнее время. Но дело свое DPS делает хорошо.
 Обновление драйверов Windows через DriverPack Solution
 - Если вы не смогли выполнить установку, либо обновление вам не помогло, тогда можно сделать откат системы до точки восстановления, где сбоев не наблюдалось.
- Также можно проверить работоспособность, запустив Windows в чистой загрузке . После чистого запуска - запустите необходимую игру или приложение и проверяйте. Следует знать, что иконок приложений или игр не будет. Их нужно вызывать из установочной папки или меню Пуск. Видео-инструкция.
- Если вы делали разгон любой из аппаратной частей ПК - отмените все.
- Для случаев со сбоями в играх - желательно обновить драйвера видеокарты на
Многие пользователи сталкивались с неприятной ошибкой операционной системы под названием BSoD или синий экран смерти. Когда она возникает, на экране вашего монитора отображается неполная техническая информация о сбое и для возобновления работы ПК вам требуется его перезагрузить. Если ошибка случилась единожды, то возможно вам не стоит беспокоиться, однако если же экран смерти появляется регулярно, тогда следует понять, в чем причина и в этом вам поможет бесплатная программа BlueScreenView.
Когда возникает BSoD система фиксирует произошедшее путем сохранения дампа со всей необходимой информацией, причем стандартными средствами получить доступ к содержимому дампа вряд ли получится. Так вот БлюСкринВьювер умеет открывать такие дампы и к тому же предоставляет сохраненные в нем данные в удобном табличном виде. Таким образом, у пользователя появляется возможность проанализировать причины сбоя, а затем постараться их устранить самостоятельно, либо доверить эту работу специалисту.
Продукт разложит для вас все по полочкам и выведет следующую информацию: список всех дампов (которые были созданы после синего экрана смерти) с их именами, дату и точное время сбоя, сохраненное изображение BSoD, подробные данные о драйверах и компонентах (имя, описание, версию и т.д.) с выделением тех, которые могли привести к ошибке. Все это позволит тщательнее изучить системное сообщение, и понять, в каком направлении нужно следовать, чтобы избавиться от сбоев.
Если вы являетесь специалистом по ремонту ПК и клиент предоставил вам дамп формата dmp, то с помощью инструмента импорта возможно его открыть. Все колонки в приложении могут быть настроены как вам удобно, более того, вы можете производить поиск по содержимому дампа, а если встретили непонятный код ошибки, то это ПО обеспечит доступ к ее поиску в Google. Если потребуется можно сохранить информацию в текстовые документы популярных форматов csv, htm, html, txt, xml и затем использовать ее без приложения.
Утилита поддерживает работу с командной строкой и является весьма нетребовательной к системным ресурсам. Чтобы раз и навсегда разобраться с синим экраном смерти, следует скачать BlueScreenView. Программа имеет небольшой размер, а версии для 32 и 64 битных ОС будут наилучшим образом совместимы с соответствующими системами, наличие русского языка не позволит пользователю запутаться в функционале. Для использования приложения без инсталляции нужно использовать его Portable версию, так в вашу операционную систему не будут внесены изменения.
Если вы активный пользователь Windows, то вы наверняка сталкивались с проблемой внезапного появления синего экрана с какими-то непонятными белыми буквами. Как правило, после перезагрузки компьютера всё снова работает, как и прежде. Но беспокойное чувство всё же остаётся.
В этой статье я расскажу вам, что означает этот синий экран, насколько он опасен, как узнать, в чём причина его появления, как её можно устранить, а также познакомлю вас с программой Bluescreenview, и расскажу, как ею пользоваться.
И прежде, чем начинать решать проблемы, нам понадобится немного теории.
Что такое синий экран
Сообщение на синем экране или BSOD (англ. «blue screen of death» — «синий экран смерти») является защитной функцией компьютера. Она выполняет приостановку работы в случае критических условий, которые могут навредить ПК. Чтобы диагностировать ошибку, необходимо прочитать сообщение.
Представьте, что человек внезапно увидел что-то страшное и упал от этого в обморок. Почему? Потому что сработала защитная функция его организма. Ведь от страха у него могли полопаться сосудики, разорваться сердечные мышцы, появиться психическая травма на всю жизнь. Поэтому тело решило не перенапрягаться и полежать немного без сознания, пока это страшное не закончится. То есть, это защитная реакция.
Когда компьютер испытывает шок, то есть глобальную ошибку, решить которую невозможно, и при которой дальнейшая работа может оказаться рискованной для его составных частей, срабатывает защитная функция. Компьютер приостанавливает работу, напоследок выводя сообщение на синем экране. Именно в этом сообщении и кроется описание того страшного, что увидел ваш компьютер, от чего впал в обморочное состояние.
 Cиний экран или BSOD (англ. «blue screen of death» — «синий экран смерти»)
 Наша задача – узнать, в чём причина.
Не спешите переустаналивать Windows при появлении синего экрана, это может и не решить проблему, так как неполадка может быть физическая, и крыться во внутренних или внешних комплектующих.
Кстати…
- Нажмите правой кнопкой на «Мой компьютер» (или «Компьютер», или что там у вас…) и выберите «Свойства».
- Выберите «Дополнительно» и нажмите кнопку «Параметры».
- Уберите галочку напротив «Выполнять автоматическую перезагрузку».
 Чтобы компьютер не перезагружался
 После этих действий при появлении синего крана компьютер не будете перезагружаться. После прочтения сообщения вы сможете перезагрузить его самостоятельно, нажав на кнопку рестарта.
Bluescreenview: как пользоваться и как диагностировать причину синего экрана
Bluescreenview – это программа, которая помогает диагностировать сообщения синего экрана и понять, в чём причина его появления. Программа крохотная и не требует установки на компьютер.
Bluescreenview – это программа, которая демонстрирует файлы дампа (которые образуются каждый раз при появлении синего экрана). Для каждого дампа можно просмотреть таблицу с полной информацией события, которая будет полезна пользователю или ремонтнику ПК для диагностирования неполадки.
Главный вопрос, который появляется при работе с Bluescreenview: как пользоваться этим? Неопытный пользователь не всё сразу сообразит. Для ускорения понимания я специально для вас даже подобрал русскую версию, которую вы можете скачать по ссылке ниже.
Итак, сейчас я вам покажу, как пользоваться Bluescreenview.
Сразу после запуска программы мы видим два окна: в верхнем отображаются все файлы дампов, которые создались после появления синих экранов; а в нижнем — драйверы устройств, среди которых красным отмечены те, которые и вызвали ошибку.
Выберите в верхнем окне один из файлов дампа, а в нижем дважды кликните на драйвер, отмеченный красным (их может быть несколько). В появившемся окне вы можете видеть полную информацию о данном программном обеспечении и, наконец, выяснить, какое устройство вызвало ошибку.
Например, на скриншоте ниже, вы видите, как я выявил, таким образом, проблему в своей звуковой карте, неполадка в которой вызывала несколько раз синий экран.
 Находим устройство, которое вызывает ошибку
 Если вы сами не хотите разбираться и пользоваться Bluescreenview, то вы можете создать отчётный файл о дампе и направить его кому-то из знакомых специалистов. Для этого необходимо кликнуть правой кнопкой на файл дампа и выбрать пункт «HTML-отчёт: выбранный элемент».
 Составить HTML отчёт об ошибке
 Обратите также внимание на то, что в меню, которое появляется при клике правой кнопкой, есть ещё пункты для того, чтобы погуглить. Возможно, вам это поможет решить проблему.
Синий экран: причины и решение
Итак, теперь вы знаете, как пользоваться Bluescreenview. и сами или с помощью специалиста выяснили, в какой части компьютера у вас проблема. Следующий вопрос: почему это произошло и как её решить?
Вот что может быть:
- Если синий экран появляется во время тяжёлых операций, например, игры и программы с большими требованиями, то проблема кроется, скорее всего, в перегреве каких-то деталей. Решение: апгрейд компьютера или отказ от этих программ и игр.
- Если синий экран появляется спонтанно, без видимых событий, а при пользовании Bluescreenview постоянно фигурирует один и тот же драйвер, то причина может быть в этом драйвере. Возможно, он от ненадёжного поставщика. Решение: установка правильного драйвера или отказ от этого драйвера и устройства.
- Если причиной синего экрана является одно и то же ПО, то, возможно, в нём обитает вирус либо оно повреждено. Решение: переустановка драйвера, переустановка системы или очистка от вирусов, возможно, поможет восстановление системы. Как это сделать в Windows XP , а в Windows 7 – .
- Но всё же, самой частой причиной синего экрана является физическая неисправность, повреждение того или иного устройства, которое обслуживается тем драйвером, которое вызывает ошибку. Решение очевидно: ремонт или замена устройства.
Насколько публикация полезна?
Нажмите на звезду, чтобы оценить!
Отправить оценку
Средняя оценка / 5. Количество оценок:
Оценок пока нет. Поставьте оценку первым.